
The deployment stage of an application is a crucial step within the development process. During this stage, the application goes from being hosted locally to being available to the target audience anywhere in the world.

With the growing use of blockchains in building applications, you might have wondered how DApps, which interact with smart contracts, are hosted.
Within this tutorial, you will learn how to host DApps with Fleek by building a sample decentralized pet adoption application using React, Hardhat, and Alchemy. We will cover:
What you need before starting this tutorial
This tutorial contains several hands-on steps. To follow along, I recommend that you do the following:
- Install React, which we will use to build the UI. I am using React v14 in this tutorial
- Install Hardhat, which we will use as our development environment
- Create a free account for the Alchemy blockchain developer platform
- Create a free account for Fleek, which you will learn more about in the next section
- Download the MetaMask browser extension
MetaMask is a cryptocurrency wallet that allows users to access DApps through a browser or mobile app. You will also want a test MetaMask account on an Ethereum testnet for testing smart contracts. I am using the Ropsten Test Network in this tutorial.
What is Fleek?
Fleek is a Web3 solution that aims to make the process of deploying your sites, DApps, and services seamless. Currently, Fleek provides a gateway for hosting your services on the InterPlanetary File System (IPFS) or on the Internet Computer (IC) from Dfinity.
Fleek describes itself as the Netlify equivalent for Web3 applications. As a result, you will find some features that are similar to Netlify, such as executing builds using docker images and generating deployment previews.
According to the IPFS blog, “Fleek’s main goal for 2022 is to restructure its IPFS infrastructure to further decentralize and incentivize it. It will also include new Web3 infrastructure providers for different pieces of the web building stack.”
Fleek offers a solution to an IPFS challenge where the hash of your website changes each time you make an update, thus making it difficult to have a fixed address hash. After the initial deployment, Fleek will build, pin, and update your site.
Let’s start building our sample DApp in the next section and deploy it using Fleek. We will host the DApp on IPFS.
Building a sample DApp to deploy to Fleek
In this section, we will build a decentralized adoption tracking system for a pet shop.
If you are familiar with the Truffle Suite, you may recognize some parts of this exercise. The inspiration for this DApp comes from the Truffle guide. We will take things a step further by using Alchemy, Hardhat, and React.
To enable you to focus on writing the smart contract and deploying the DApp, I have already built out the UI component and state. The smart contract and React code will be contained in a single project.
Simply clone the React application from my GitHub repository to begin writing the smart contract:
git clone https://github.com/vickywane/react-web3
Next, change the directory to the cloned folder and install the dependencies listed in the package.json file:
# change directory
cd react-web3

# install application dependencies
npm install
With the React application set up, let’s proceed to create the pet adoption smart contract.
Creating the pet adoption smart contract
Within the react-web3 directory, create a contracts folder to store the Solidity code for our pet adoption smart contract.
Using your code editor, create a file named Adoption.sol and paste in the code below to create the necessary variables and functions within the smart contract, including:
- A 16-length array to store the address of each pet adopter
- A function to adopt a pet
- A function to retrieve the address of all adopted pets
//SPDX-License-Identifier: Unlicense
// ./react-web3/contracts/Adoption.sol
pragma solidity ^0.8.0;

contract Adoption {
  address[16] public adopters;
  event PetAssigned(address indexed petOwner, uint32 petId);

  // adopting a pet
  function adopt(uint32 petId) public {
    require(petId >= 0 && petId <= 15, "Pet does not exist");

    adopters[petId] = msg.sender;
    emit PetAssigned(msg.sender, petId);
  }

  // Retrieving the adopters
  function getAdopters() public view returns (address[16] memory) {
    return adopters;
  }
}
Next, create another file named deploy-contract-script.js within the contracts folder. Paste the JavaScript code below into the file. The code will act as a script that uses the asynchronous getContractFactory method from Hardhat to create a factory instance of the adoption smart contract, then deploy it.
// react-web3/contract/deploy-contract-script.js
require('dotenv').config()
const { ethers } = require("hardhat");

async function main() {
  // We get the contract to deploy
  const Adoption = await ethers.getContractFactory("Adoption");
  const adoption = await Adoption.deploy();
  await adoption.deployed();

  console.log("Adoption Contract deployed to:", adoption.address);
}

// We recommend this pattern to be able to use async/await everywhere
// and properly handle errors.
main()
  .then(() => process.exit(0))
  .catch((error) => {
    console.error(error);
    process.exit(1);
});
Finally, create a file called hardhat.config.js. This file will specify the Hardhat configuration.
Add the following JavaScript code into the hardhat.config.js file to specify a Solidity version and the URL endpoint for your Ropsten network account.
require("@nomiclabs/hardhat-waffle");
require('dotenv').config();

/**
 * @type import('hardhat/config').HardhatUserConfig
 */
module.exports = {
  solidity: "0.8.4",
  networks: {
    ropsten: {
      url: process.env.ALCHEMY_API_URL,
      accounts: [`0x${process.env.METAMASK_PRIVATE_KEY}`]
    }
  }
};
I am using the environment variables ALCHEMY_API_URL and METAMASK_PRIVATE_KEY to store the URL and private account key values used for the Ropsten network configuration:
- The
METAMASK_PRIVATE_KEYis associated with your MetaMask wallet - The
ALCHEMY_API_URLlinks to an Alchemy application
You can store and access these environment variables within this react-web3 project using a .env file and the dotenv package. We will review how to do this in the next section.
If you’ve been following along successfully, you haven’t yet created an Alchemy application at this point in the project. You will need to use its API URL endpoint, so let’s proceed to create an application on Alchemy.
Creating an Alchemy application
Alchemy provides features that enable you to connect to an external remote procedure call (RPC) node for a network. RPC nodes make it possible for your DApp and the blockchain to communicate.
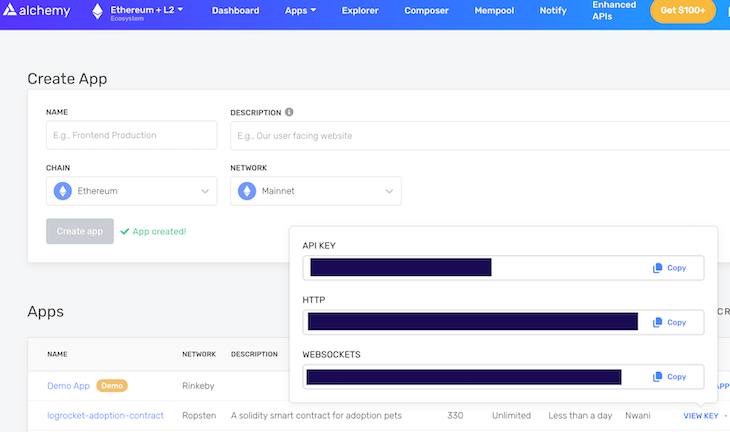
Using your web browser, navigate to the Alchemy web dashboard and create a new app.
Provide a name and description for the app, then select the Ropsten network. Click the “Create app” button to proceed.

After the app is created, you will find it listed at the bottom of the page.
Click “View Key” to reveal the API keys for the Alchemy app. Take note of the HTTP URL. I have redacted this information in the image below.
Create a .env file within your Hardhat project, as demonstrated below. You will use this .env file to store your Alchemy app URL and MetaMask private key.
// react-web3/.env ALCHEMY_API_URL=METAMASK_PRIVATE_KEY=
Replace the ALCHEMY_HTTP_URL and METAMASK_PRIVATE_KEY placeholders above with the HTTP URL from Alchemy and your MetaMask private key. Follow the MetaMask Export Private Key guide to learn how to export this information for your wallet.
Lastly, execute the next command to deploy your pet adoption smart contract to the specified Ropsten network:
npx hardhat run contracts/deploy-contract-script.js --network ropsten
As shown in the image below, note the address that is returned to your console after the contract is deployed. You will need this address in the next section.

At this point, the pet adoption smart contract has been deployed. Let’s now shift focus to the DApp itself and create functions to interact with the pet adoption smart contract.
Building the DApp frontend
Similar to the pet shop tutorial from the Truffle guide, our DApp will display sixteen different breeds of dogs that can be adopted. Detailed information for each dog is stored in the src/pets.json file. We are using TailwindCSS to style this DApp.
To begin, open the state/context.js file and replace the existing content with the code below:
// react-web3/state/context.js

import React, {useEffect, useReducer} from "react";
import Web3 from "web3";
import {ethers, providers} from "ethers";

const {abi} = require('../../artifacts/contracts/Adoption.sol/Adoption.json')

if (!abi) {
    throw new Error("Adoptiom.json ABI file missing. Run npx hardhat run contracts/deploy-contract-script.js")
}

export const initialState = {
    isModalOpen: false,
    dispatch: () => {
    },
    showToast: false,
    adoptPet: (id) => {
    },
    retrieveAdopters: (id) => {
    },
};

const {ethereum, web3} = window

const AppContext = React.createContext(initialState);
export default AppContext;

const reducer = (state, action) => {
    switch (action.type) {
        case 'INITIATE_WEB3':
            return {
                ...state,
                isModalOpen: action.payload,
            }
        case 'SENT_TOAST':
            return {
                ...state,
                showToast: action.payload.toastVisibility
            }
        default:
            return state;
    }
};

const createEthContractInstance = () => {
    try {
        const provider = new providers.Web3Provider(ethereum)
        const signer = provider.getSigner()
        const contractAddress = process.env.REACT_APP_ADOPTION_CONTRACT_ADDRESS

        return new ethers.Contract(contractAddress, abi, signer)
    } catch (e) {
        console.log('Unable to create ethereum contract. Error:', e)
    }
}

export const AppProvider = ({children}) => {
    const [state, dispatch] = useReducer(reducer, initialState);

    const instantiateWeb3 = async _ => {
        if (ethereum) {
            try {
                // Request account access
                return await ethereum.request({method: "eth_requestAccounts"})
            } catch (error) {
                // User denied account access...
                console.error("User denied account access")
            }
        } else if (web3) {
            return
        }
        return new Web3(Web3.givenProvider || "ws://localhost:8545")
    }

    const adoptPet = async id => {
        try {
            const instance = createEthContractInstance()
            const accountData = await instantiateWeb3()

            await instance.adopt(id, {from: accountData[0]})

            dispatch({
                type: 'SENT_TOAST', payload: {
                    toastVisibility: true
                }
            })

            // close success toast after 3s
            setTimeout(() => {
                dispatch({
                    type: 'SENT_TOAST', payload: {
                        toastVisibility: false
                    }
                })
            }, 3000)
        } catch (e) {
            console.log("ERROR:", e)
        }
    }

    const retrieveAdopters = async _ => {
        try {
            const instance = createEthContractInstance()
            return await instance.getAdopters()
        } catch (e) {
            console.log("RETRIEVING:", e)
        }
    }

    useEffect(() => {
        (async () => { await instantiateWeb3() })()
    })

    return (

            {children}

    );
};
Reading through the code block above, you will observe the following:
The Ethereum and Web3 objects are destructured from the browser window. The MetaMask extension will inject the Ethereum object into the browser.
The createEthContractInstance helper function creates and returns an instance of the pet adoption contract using the contract’s ABI and address from Alchemy.
The instantiateWeb3 helper function will retrieve and return the user’s account address in an array, using MetaMask to verify that the Ethereum window object is defined.
The instantiateWeb3 helper function is also executed in a useEffect hook to ensure that users connect with MetaMask immediately after opening the application in the web browser.
The adoptPet function expects a numeric petId parameter, creates the Adoption contract instance, and retrieves the user’s address using the createEthContractInstance and instantiateWeb3 helper functions.
The petId parameter and user account address are passed into the adopt method from the pet adoption contract instance to adopt a pet.
The retrieveAdopters function executes the getAdopters method on the Adoption instance to retrieve the address of all adopted pets.
Save these changes and start the React development server to view the pet shop DApp at http://localhost4040/.
At this point, functions within the adoption contract have been implemented in the state/context.js file, but not executed yet. Without authenticating with MetaMask, the user’s account address will be undefined and all buttons for adopting a pet will be disabled, as shown below:

Let’s proceed to add the pet adoption contract address as an environment variable and host the DApp on Fleek.
Deploying the React DApp to Fleek
Hosting a DApp on Fleek can be done through the Fleek dashboard, Fleek CLI, or even programmatically using Fleek GitHub Actions. In this section, you will learn how to use the Fleek CLI as we host the pet shop DApp on IPFS through Fleek.
Configuring the Fleek CLI
Execute the command below to install the Fleek CLI globally on your computer:
npm install -g @fleek/cli
To use the installed Fleek CLI, you need to have an API key for a Fleek account stored as an environment variable in your terminal. Let’s proceed to generate an API key for your account using the Fleek web dashboard.
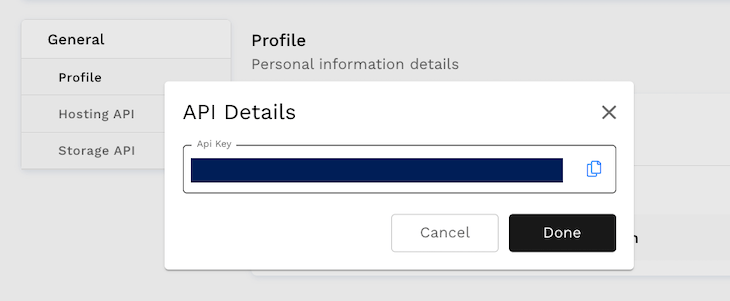
Using your web browser, navigate to your Fleek account dashboard and click your account avatar to reveal a popup menu. Within this menu, click “Settings” to navigate to your Fleek account settings.

Within your Fleek account settings, click the “Generate API” button to launch the “API Details” modal, which will generate an API key for your Fleek account.
Take the generated API key and replace the FLEEK_API_KEY placeholder in the command below:
export FLEEK_API_KEY='FLEEK_API_KEY'
Execute this command to export the Fleek API key as a temporary environment variable for your computer terminal. The Fleek CLI will read the value of the FLEEK_API_KEY variable when you execute a command against your Fleek account.
Initializing a site through the Fleek CLI
You need to generate the static files for the React DApp locally before you can host the DApp and its files on IPFS using Fleek.
Generating the static files can be automated during the build process by specifying a Docker image and the commands to be used in building your static files. However, in this tutorial, you will generate the static files manually.
Execute the npm command below to generate static files for the DApp in a build directory.
npm run build
Next, initialize a Fleek site workspace within the react-web3 folder using the following command:
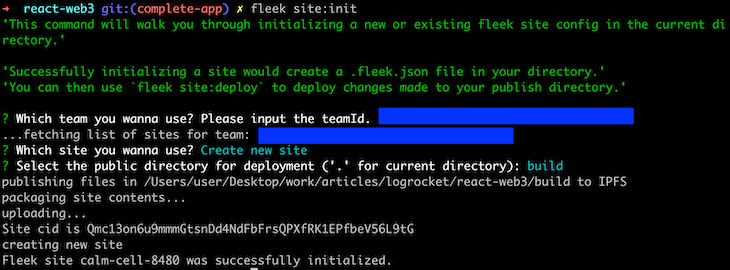
fleek site:init
The initialization process is a one-time step for each Fleek site. The Fleek CLI will launch an interactive session guiding you through the process of initializing the site.
During the initialization process, you will be prompted to input a teamId, as seen in the following image:
You will find your teamId as numbers within the Fleek dashboard URL. An example teamId is shown below:
![]()
At this point, the Fleek CLI has generated a .fleek.json file within the react-web3 directory with Fleek’s hosting configurations. One thing is missing, however: the environment variable containing the pet adoption smart contract address.
Let’s proceed to see how to add environment variables for locally deployed sites on Fleek.
Adding an environment variable
Fleek enables developers to manage sensitive credentials for their sites securely either through the Fleek dashboard or configuration file. As you are locally hosting a site from your command line in this tutorial, you will specify your environment variable in the .fleek.json file.
In the code below, replace the ADOPTION_CONTRACT_ADDRESS placeholder with the pet adoption smart contract address. Remember, this address was returned after we created the Alchemy application and deployed the smart contract using the npx command earlier in this tutorial.
 {
  "site": {
    "id": "SITE_ID",
    "team": "TEAM_ID",
    "platform": "ipfs",
    "source": "ipfs",
    "name": "SITE_NAME"
  },
  "build": {
    "baseDir": "",
    "publicDir": "build",
    "rootDir": "",
    "environment": {
       "REACT_APP_ADOPTION_CONTRACT": "ADOPTION_CONTRACT_ADDRESS"
    }
  }
}
Note: The SITE_ID, TEAM_ID, and SITE_NAME placeholders will be automatically generated by the Fleek CLI in the .fleek.json file when you initialize a Fleek site.
The code above also contains the following object, which you should add into the build object within your .fleek.json file:
    "environment": {
       "REACT_APP_ADOPTION_CONTRACT": "ADOPTION_CONTRACT_ADDRESS"
    }
The JSON object above specifies a node docker image to be used by Fleek in building the DApp. During the build process, the npm commands in the command field will be executed.
Execute the command below to redeploy the DApp using the new build configuration in the .fleek.json file.
fleek site:deploy

Congratulations! The DApp has been fully deployed, and you now can access the live site through your web browser. You can also get more detailed information about the hosted DApp through the Fleek dashboard by following these steps:
- Navigate to your Fleek dashboard
- Click the name of DApp you deployed
- See the deployed site URL on the left
- See a deploy preview image at the right

Click the site URL to open the DApp in a new browser tab. You will be prompted to connect a MetaMask wallet immediately after the DApp is launched. After a wallet is connected, you will be able to adopt any of the sixteen dogs by clicking the “Adopt” buttons.

That’s it! Your sample pet adoption DApp has been deployed to Fleek.
Conclusion
In this tutorial, we focused on building and hosting a sample DApp on IPFS through Fleek. The process began similarly to the pet adoption smart contract from Truffle’s guide. Then, you took it a step further by building a DApp to interact with the pet adoption smart contract.
If you want to leverage the steps within this tutorial for hosting a production-ready DApp, I strongly recommend that you consider the following:
First, make sure to connect Fleek to a code host provider, such as GitHub, and deploy the DApp from a production branch within its repository. This will allow Fleek to automatically redeploy the DApp when you push a new code commit to the deployed branch.
Second, if you are using a .fleek.json file to store environment variables, include the .fleek.json filename in your .gitignore file. Doing this will ensure that the .fleek.json file is not pushed and your environment variables are not exposed.
I hope you found this tutorial useful. If you have any questions, feel free to share a comment.
Join organizations like Bitso and Coinsquare who use LogRocket to proactively monitor their Web3 apps
Client-side issues that impact users’ ability to activate and transact in your apps can drastically affect your bottom line. If you’re interested in monitoring UX issues, automatically surfacing JavaScript errors, and tracking slow network requests and component load time, try LogRocket. https://logrocket.com/signup/
LogRocket is like a DVR for web and mobile apps, recording everything that happens in your web app or site. Instead of guessing why problems happen, you can aggregate and report on key frontend performance metrics, replay user sessions along with application state, log network requests, and automatically surface all errors.
Modernize how you debug web and mobile apps — Start monitoring for free.
#build #DApp #host #IPFS #Fleek


